What is network discovery? How to enable it safely


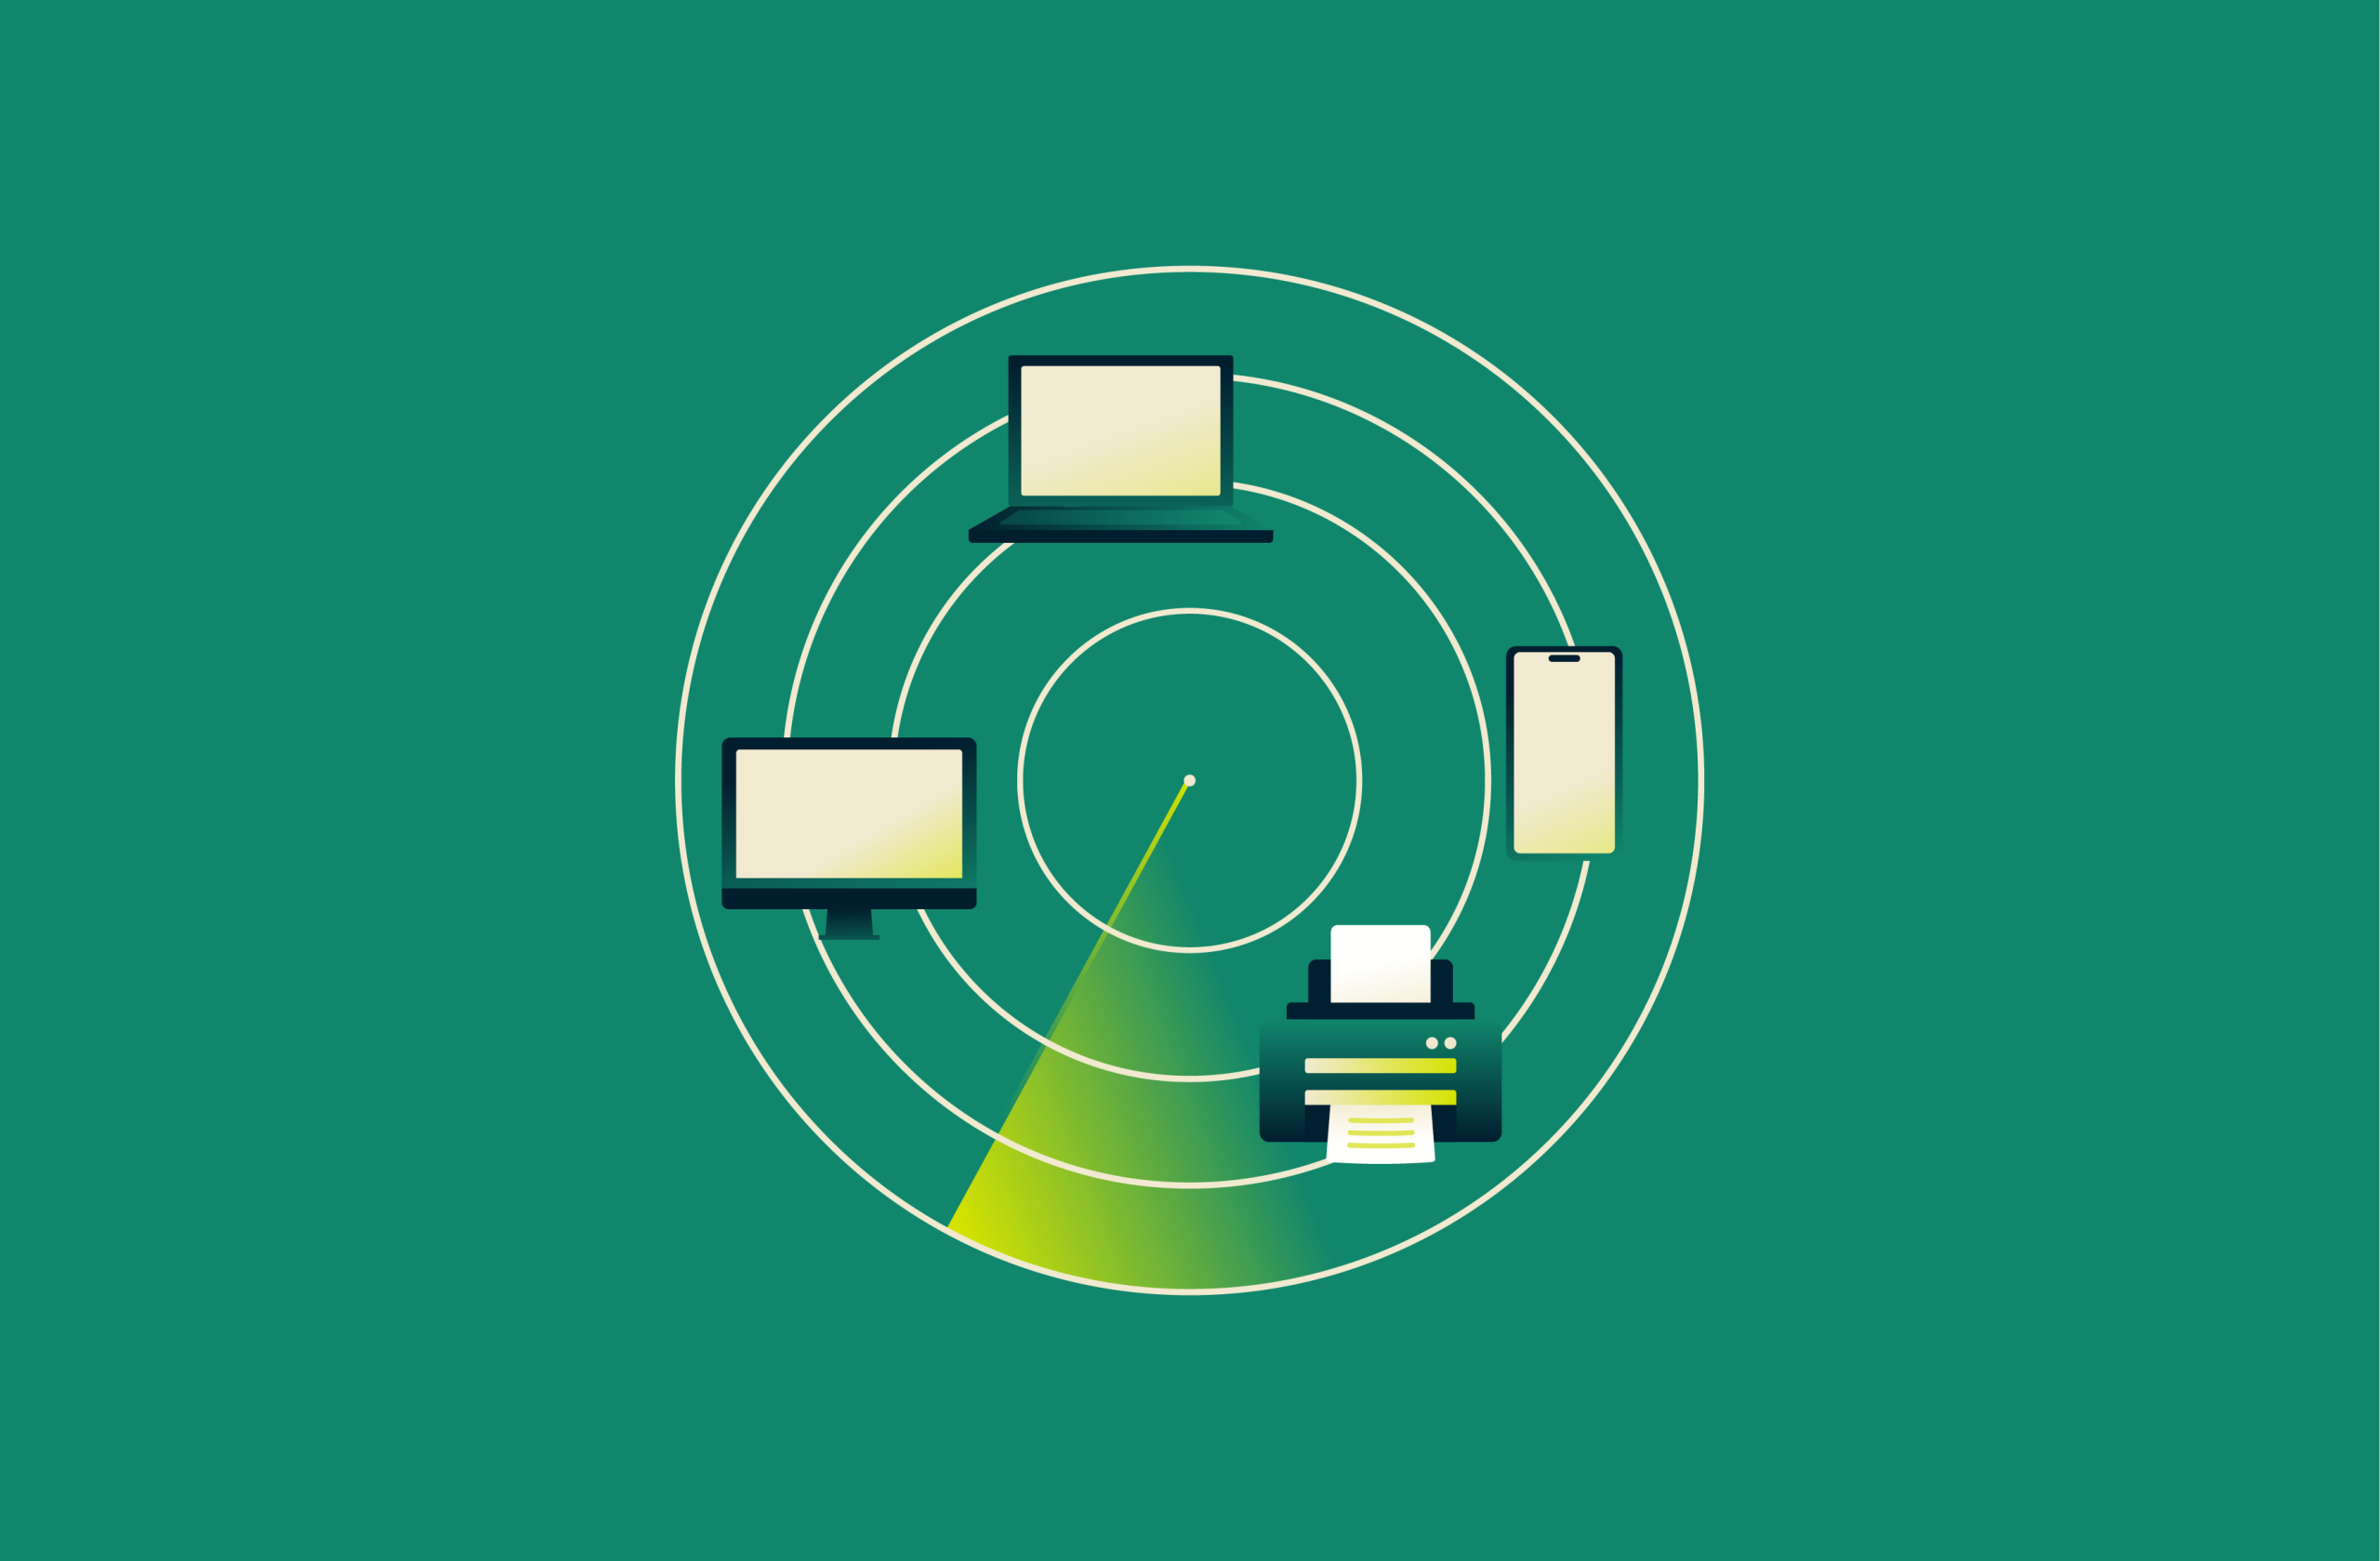
When you connect to a new network, your computer often asks if you want your PC to be discoverable. This single click controls network discovery: a function that allows your device to find other devices (like computers, printers, and smart TVs) on the same network and, in turn, enables them to find your device.
This guide explains how this process works, why it's important for connectivity, and how you can enable network discovery securely across your networks.
What is network discovery?
Network discovery is an operating system feature that lets your device detect other devices and services on the same local network and allows those devices to detect yours. When it’s enabled, your computer sends out discovery requests using built-in protocols and listens for responses.
Devices that reply are added to your system’s list of nearby resources, which can include shared folders, printers, media servers, and smart devices. That information is shown in places like the Network view in Windows or the Shared section in macOS Finder.
Difference between network discovery and network connections
A network connection is the link created when your device joins a network over Wi-Fi, Ethernet, or another access method and receives the settings needed to send and receive data. It provides your device with a path to other systems on the local network or on the internet.
Network discovery runs only after a network connection exists. You can also be fully online with discovery disabled.
How network discovery works
Network discovery relies on simple broadcast and multicast messages that stay inside your local network. Operating systems use different network protocols for this, but the core behavior is the same: devices announce themselves, respond to queries, and build a list of what’s available nearby.
Layer 2 vs. Layer 3 discovery
Network discovery can happen at two different layers of the network stack:
Layer 2 (data link layer)
Layer 2 discovery happens at the Media Access Control (MAC) address level. A MAC address is a unique hardware identifier built into every network card, and devices can only see each other’s MAC traffic when they’re on the same subnet or virtual local area network (VLAN).
Because routers don’t route this kind of traffic between networks, Layer 2 discovery stays strictly inside that local segment.
Layer 3 (network layer)
Layer 3 discovery happens at the IP address level. It uses multicast messages addressed to specific IP groups.
Routers can forward this multicast traffic between subnets, but only if they’re configured to do so. Because of that, Layer 3 discovery can extend beyond a single subnet or VLAN, but it only works across segments when the network explicitly allows those multicast groups to pass through.
Key discovery protocols in use today
Link Layer Discovery Protocol (LLDP)
LLDP is a Layer 2 protocol used by switches, routers, and other network devices to announce essential information about themselves, such as their name, port ID, and capabilities. It’s mainly used for network topology discovery to give administrators and software a clear picture of how network devices are physically connected.
Simple Network Management Protocol (SNMP)
SNMP isn’t a discovery protocol on its own, but it becomes important once a discovery tool has identified a device’s IP address. At that point, tools such as network scanners, monitoring platforms, and inventory systems can query the device over SNMP to pull details like interface lists, port status, hardware model, and uptime. It’s widely used in monitoring and inventory systems.
Internet Control Message Protocol (ICMP)
ICMP is a basic network protocol used to send diagnostic messages between devices. In the context of network discovery, it’s often used for the very first question: is anything at this address alive? A tool sends an echo request (ping) to an IP address, and if it receives an echo reply, it knows the address is active.
Many discovery systems repeat this basic test across all the IP addresses in a subnet to build an initial list of live hosts. That repeated reachability check is what’s called an ICMP sweep, and it shows which addresses respond, giving the discovery process a starting point.
Discovery vs. network scanning: Understanding the boundary
Network discovery and network scanning both collect information about devices on a network. The difference sits in scope, intent, and intensity.
Network scanning is an active probing technique, often performed with dedicated subnet-scanning tools. A scanner sends packets to many addresses, many ports, or both, to see who responds and what services run there. It can use ICMP for reachability checks, SNMP for bulk information from managed devices, and other methods to build a fuller picture of hosts and services.
Network discovery, on the other hand, relies on devices voluntarily announcing themselves or responding to lightweight, cooperative messages so they can be found, mapped, or accessed. If a device chooses not to announce anything, discovery simply won’t see it.
Why network discovery matters in modern networks
Network discovery is more than a convenient feature. It gives users and administrators clearer awareness of what’s present on a network and how it behaves.
Gaining real-time visibility into connected devices
Network discovery helps a system collect information about devices that respond on the local network. This can include names, basic roles, and available services.
In home use, network discovery makes it easier to locate shared folders, printers, and media devices. In business use, it supports a current view of visible hosts on each segment, which aids monitoring and troubleshooting. The view is helpful, but it’s not guaranteed to include every device.
Simplifying network mapping and topology detection
Discovery traffic provides the raw data that management tools use to build a logical network map. Protocols such as LLDP and SNMP supply details about neighbors, interfaces, and device properties. Mapping software reads that data and produces diagrams.
Supporting asset inventory and change management
For organizations, network discovery contributes to basic asset awareness. When systems detect a new responding device, administrators can compare it with an approved list, decide how to treat it, and track changes over time. This helps with patch planning, hardware records, and spotting unknown devices that might raise security concerns.
Is network discovery safe?
The safety of network discovery depends on the network type, device settings, and who shares the environment.
Potential risks of enabling discovery
When network discovery is active, your device becomes easier to see on the local segment. Depending on the configuration, it may respond with information such as your device’s name, workgroup, or domain, and shared resources.
On a hostile or unknown network, that extra visibility can assist an attacker running scans to find open ports or outdated services. This is why systems like Windows link discovery settings to network profiles.
Safe usage scenarios: Home, public, and business networks
- Home networks (private): On a home network that you manage and protect with a strong Wi-Fi key, turning on network discovery for trusted devices is usually safe. Risk increases if many guests use the same network or if devices aren’t updated.
- Business networks (managed): In corporate environments, the discovery policy should follow internal standards. Some networks keep discovery active only on selected segments to support file servers, printers, and management platforms. Protection relies mainly on authentication, segmentation, and endpoint security, not on discovery alone.
- Untrusted networks (public): On public or guest Wi-Fi that you don’t control, network discovery should stay off. That includes cafés, airports, hotels, and similar locations. This makes your device a less convenient target for nearby attackers.
As a general rule, you should keep network discovery disabled on networks you don’t trust or administer. Use it on private networks only where you need local sharing or management features and have other controls in place.
How to limit exposure with proper network configuration
Enabling network discovery doesn’t have to mean exposing your device to the entire network. Most of the risk comes from allowing discovery traffic to reach places it shouldn’t. With a few configuration choices, you can keep discovery useful inside trusted spaces while preventing unwanted visibility elsewhere.
Use the right network profile (public vs. private)
On Windows, every Wi-Fi or Ethernet connection is assigned a profile. That profile controls whether your device is allowed to participate in network discovery.
- Private network: This is meant for your home or another trusted network. Discovery is allowed, so your PC can see nearby devices and be seen by them.
- Public network: This is meant for places like cafés, airports, hotels, or guest Wi-Fi. Discovery is automatically disabled so your PC stays hidden from everyone else on that network.
Note that the profile labels describe the network you’re connected to, not whether your device itself is public or private. You would choose “Private network” on a trusted network to make your device discoverable, or “public,” and “Public network” on an untrusted network to make your device undiscoverable, or “private.”
Disable discovery on untrusted interfaces
If your device connects to multiple networks (Wi-Fi, Ethernet, VPN, hotspot), discovery should be disabled on any interface that isn’t part of your trusted local area network (LAN). Most operating systems let you control this per-network, so visibility never leaks onto public or shared segments.
Use proper subnetting or VLANs to contain discovery traffic
Discovery works within a broadcast or multicast domain. By separating devices into different subnets or VLANs, you prevent discovery traffic from crossing into areas it doesn’t belong. For example, your guests don’t need to see internal PCs, and servers shouldn’t be visible to client segments unless required. Keeping devices in isolated network segments stops unnecessary visibility by design.
Block multicast and broadcast across network boundaries
Routers don’t forward Layer 2 broadcasts by default, but some multicast-based discovery can cross subnets if allowed. Leaving multicast forwarding disabled ensures discovery traffic stays local, preventing devices in one subnet from advertising themselves to another.
Restrict what your device advertises
Discovery only reveals what you choose to announce. Most operating systems let you choose which services you actually publish. Even with discovery on, you can limit exposure by disabling unneeded features like file sharing, media sharing, remote management, or printer sharing.
Use firewalls to filter who can see you
Your device’s local firewall can decide which networks are allowed to send or receive discovery traffic. Even if discovery is enabled, the firewall can restrict it so only certain networks can see you. For example, you might allow discovery on your home LAN so your devices can find each other but block it on guest Wi-Fi or other untrusted segments.
How VPNs affect network discovery
You may have noticed that local printers or file shares stop appearing once a VPN connection is active. That’s because VPNs can change how your device sees the local network and how the local network sees you (and it’s not a network fault).
Can VPNs block local device discovery?
Yes, a VPN can block discovery because it changes how your device routes traffic by creating an encrypted tunnel to the VPN server. When the VPN becomes the preferred route, your system may stop using the local network for anything other than basic connectivity. Discovery traffic that would normally stay on the LAN gets redirected toward the tunnel instead or is filtered outright.
When VPNs create isolation from LAN devices
VPNs create full isolation from local devices when their configuration specifically restricts access to the LAN. It’s often intentional: many VPNs treat the local network as untrusted and prevent your device from being visible to anything on it while the VPN is active. This typically occurs in three situations:
- Full-tunnel mode is enforced: In a full-tunnel setup, the VPN sends all of your traffic, regardless of where it's going, through the encrypted tunnel. Your device stops sending packets directly to anything on the local network, even if those devices are sitting right next to you. Since discovery traffic never reaches the LAN in the first place, local devices simply never show up.
- Local network access is disabled: Some VPNs include a security policy that blocks contact with the LAN entirely. This is common on work VPNs that don’t trust the network you’re physically connected to. Even if your computer tries to reach a local device, the VPN’s rules stop that traffic from leaving your interface, effectively cutting you off from the LAN.
- Discovery traffic is restricted: Some VPN clients block broadcast and multicast messages needed for discovery to avoid exposing your device or to prevent attackers on the LAN from probing it. When these messages are filtered, your device can’t participate in the normal “who’s here?” communication that discovery uses, so nothing on the LAN becomes visible.
Under any of these conditions, you remain physically connected to the network but logically separated from it, so nearby devices simply aren’t visible.
Configuring VPN settings to allow discovery
Most VPN clients include settings that let you keep the tunnel active while still allowing LAN visibility. These options tell the VPN to leave local network traffic on your normal interface instead of routing it into the tunnel. Common features that restore discovery include:
Split tunneling
Many VPNs, including ExpressVPN, support split tunneling, which is a feature that lets you select what apps or services use the VPN and which get routed outside the tunnel. You can use this feature to exclude local subnets from the VPN, while the rest of your external traffic is protected. This allows discovery to function even while your VPN is on.
Allow LAN access
Some VPN clients offer a simple toggle that permits communication with your local subnet while the VPN is connected. This achieves the same result as split tunneling but without requiring manual routing rules.
Local device access
Other clients provide per-network or per-interface controls that exclude local-network packets from the tunnel. When enabled, discovery protocols remain on the LAN and local devices stay visible. If you’re using a corporate VPN, these options may be intentionally disabled for security reasons.
How to enable network discovery on Windows 11
When you first connect to a new Wi-Fi network, Windows pops up a prompt asking if you want your PC to be discoverable. To quickly check whether you’ve set this to Public (not discoverable) or Private (discoverable), follow these steps:
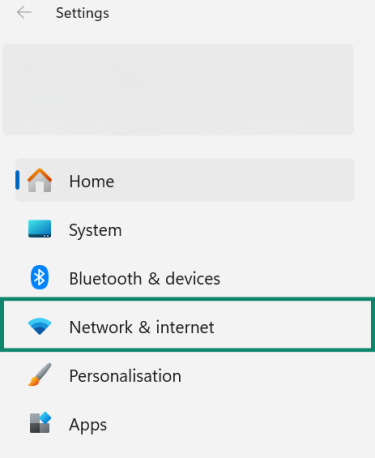
- Click the Start button and open Settings.
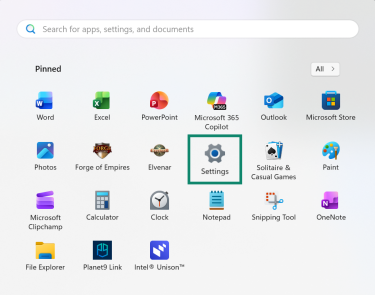
- In the left-hand menu, select Network & internet.
- Click Properties for your active connection, which will be Wi-Fi or Ethernet.
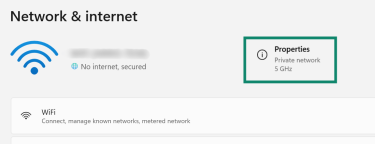
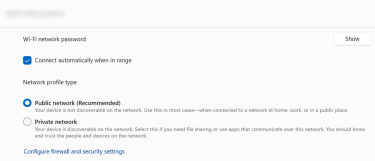
- At the top, you’ll see Network profile type. This shows whether network discovery is on or off. Public means your device isn’t discoverable. To change this to discoverable, tick Private.
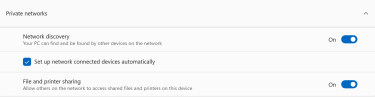
Managing private vs. public network profiles
To control how Windows should behave on trusted networks compared to public ones, use these settings to define what each profile is allowed to do:
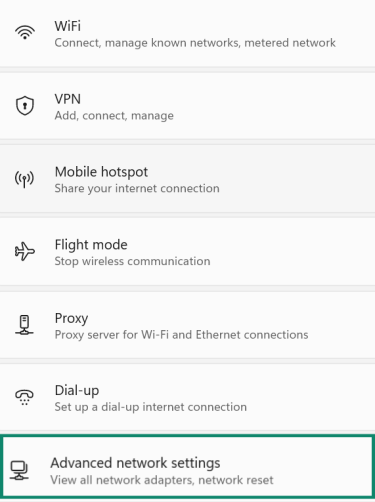
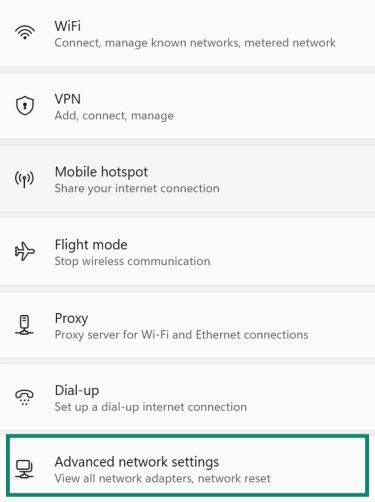
- In Settings, open Network & internet.

- Select Advanced network settings.
- Select Advanced sharing settings.
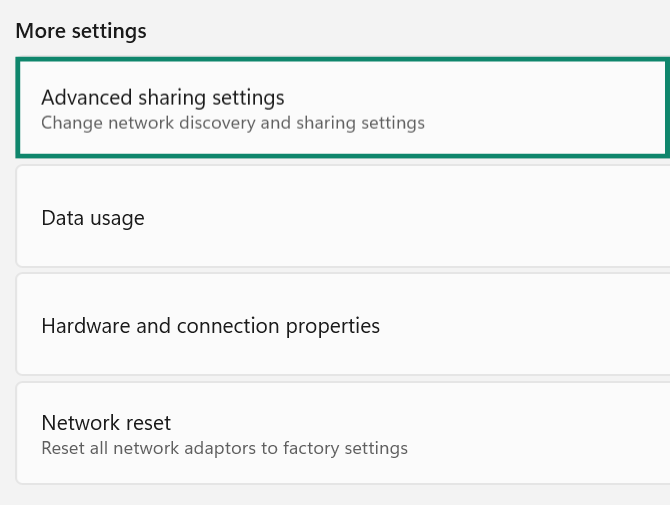
- Under Private networks, confirm that Network discovery and File and printer sharing are set to On only if you need to share. This makes your PC visible to other devices on your home network, and it lets you share files or printers when you actually want to.
- Under Public networks, keep Network discovery and File and printer sharing set to Off. This keeps your PC hidden and locked down on public Wi-Fi, so nothing on your device is visible to anyone else on the network.
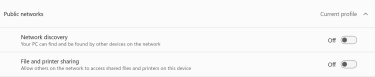
Note: On work machines, these options may be locked by your IT team.
Adjusting Windows firewall rules for discovery
When you switch your profile to Private, Windows automatically enables the correct firewall rules. If discovery still isn't working, you might have a firewall blocking network discovery. This could be the built-in Windows Defender Firewall or a third-party security suite.
To check Windows Defender Firewall:
- Go to Start > Windows Defender Firewall.
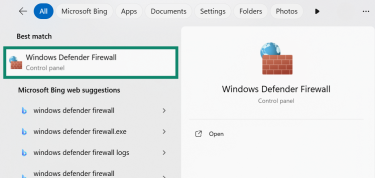
- Select the entry named Allow an app or feature through Windows Defender Firewall.
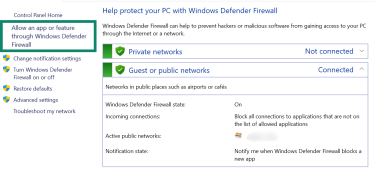
- In the list, locate Network Discovery.

- Tick the box for Private networks. Leave the Public column in Network Discovery unchecked, so your PC does not answer discovery requests on public networks.
Troubleshooting network discovery issues
If a device is online but doesn’t appear in your network list (a common reason for issues like file sharing not working), the cause usually lies in profiles, firewalls, services, or isolation features.
Why devices aren't showing up on the network
- Network profile and discovery mismatch: Different operating systems use different names, but they all have a concept of “trusted” versus “untrusted” networks. If one device treats the network as untrusted, it won’t advertise itself and may ignore discovery requests from others.
- Firewall rules: All major operating systems include firewalls that can block broadcast, multicast, or service-specific ports used for discovery. If discovery-related rules are off, or if incoming requests are being filtered, devices won’t appear even though the network profile is correct.
- Required services disabled: Discovery relies on background components that must be running. For macOS, that’s mDNSResponder (Bonjour); Windows uses Function Discovery services, as well as SSDP and WS-Discovery; and Linux relies on Avahi or similar service daemons. If these services crash or are disabled, the device won’t announce itself or process discovery messages.
- Network hardware isolation: Some routers offer access point (AP) isolation, client isolation, or guest network modes that block traffic between clients. Devices on that Wi-Fi can reach the internet but not each other.
Fixing firewall or profile conflicts
There are three typical ways to fix these conflicts.
Reset your firewall to its default settings
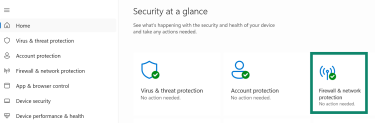
- Open Windows Security from the Start menu and click Firewall & network protection.
- Click Restore firewalls to default.
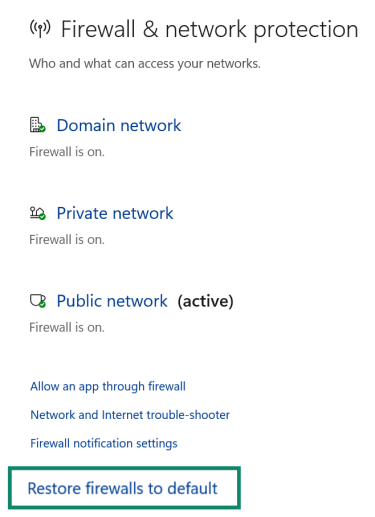
- Click Restore defaults and then Yes to confirm.

Use the Command Prompt for a full reset
- Open Command Prompt as an administrator and type the command netsh advfirewall reset and press Enter.

- Restart your computer to apply the changes.
Run the Windows firewall troubleshooter
- Go to Windows Security, select Firewall & network protection, and then Network and Internet trouble-shooter.
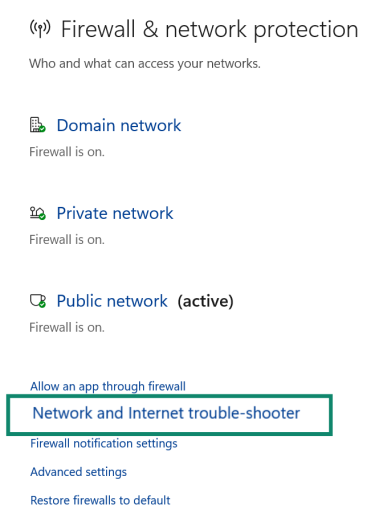
- Windows may ask you questions like, ““Which network are you trying to fix?” to narrow down the troubleshooting. If it finds something, it will apply automatic fixes. At the end, Windows will show you a summary.
Tip: Temporarily disable or uninstall any third-party antivirus or security software to see if it’s causing a conflict.
How to reset network settings safely
If all else fails, you can try a network reset. Resetting removes all network adapters and reinstalls them, which means you’ll lose all saved Wi-Fi networks and passwords, as well as custom DNS settings, static IP addresses, and VPN configurations. It’s best to use it only as a last resort.
- Go to Settings > Network & internet > Advanced network settings.
- Click Network reset.
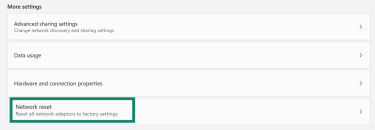
- Click Reset now.

- Your computer will restart. When it reconnects to your network, it will ask you to choose a profile again. Select Private, and this will often clear up any deep-seated configuration problems.
Advanced tools and admin tips
For administrators and power users, it’s often quicker to confirm discovery settings from the command line and to back findings with logs and monitoring.
Checking discovery via the command line or PowerShell
Using PowerShell (recommended):
- Open PowerShell as Administrator and check the current network profiles using the following command:
Get-NetFirewallRule -DisplayGroup "Network Discovery" |

Select-Object DisplayName, Enabled, Profile
 This command shows you all the firewall rules related to Network Discovery. For each rule, it shows you whether the rule is turned on or off and which type of network it applies to.
If it says Enabled: True and Profile: Private, that part of Network Discovery is allowed on your home network. If it says Enabled: False and Profile: Public, that part is blocked on public networks.
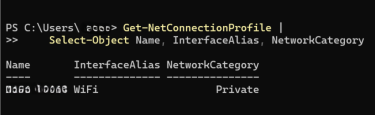
- To see your active profile:
Get-NetConnectionProfile |

Select-Object Name, InterfaceAlias, NetworkCategory
- Change a profile to Private for a trusted network:
Set-NetConnectionProfile -InterfaceAlias "WiFi" -NetworkCategory Public

Using Command Prompt:
- Open Command Prompt as Administrator and type in the following command:
netsh advfirewall firewall show rule name=all | findstr /I /C:"Network Discovery"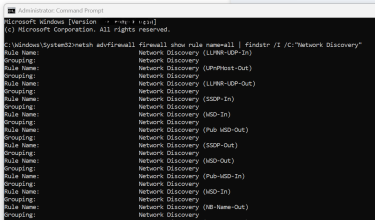
- This command shows all firewall entries that belong to the Network Discovery group. Each entry has its own set of details, and the important parts to look for are whether the rule is active and which network category it’s tied to.
- If a rule is listed as Enabled: Yes for the Private profile, that means the firewall is permitting that Network Discovery function on a private network.
- If the rule appears as Enabled: No under the Public profile, that feature is blocked when you’re connected to a public network, which is the standard for security reasons.
Monitoring network discovery logs
If network discovery isn't working even after you've set your network profile to private and checked your firewall, the problem likely lies deeper. The services listed below are the underlying Windows components that actually perform the tasks of discovery.
Checking their logs in the Event Viewer will let you see if one of these core services has failed to start, crashed, or reported a specific error, which can pinpoint the exact cause of the failure.
- Function Discovery Resource Publication (FDResPub): Responsible for broadcasting or publishing your computer's presence and its shared resources (like shared folders and printers).
- Function Discovery Provider Host (fdPHost): This service acts as the host for the discovery "providers," the components that find other devices.
- SSDP Discovery (SSDPSRV): This service implements the Simple Service Discovery Protocol (SSDP), which is a specific method used by many devices (especially media devices, routers, and printers) to announce themselves on a network.
- Universal Plug and Play (UPnP Device Host): This service allows your computer to host and control UPnP-compatible devices, which is common for media streaming to smart TVs or interacting with network-aware hardware.
- Network List or Network Profile services: These services are the "gatekeepers." They are responsible for identifying the network you're connected to and, most importantly, applying the correct profile (Public or Private).
To monitor them:
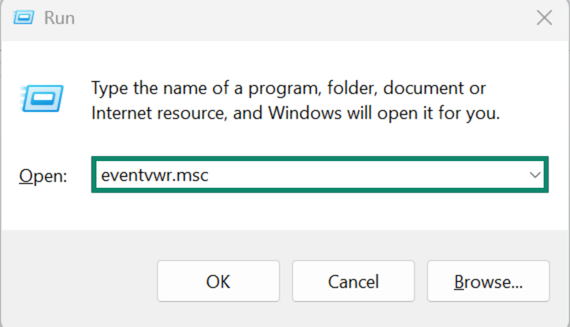
- Press Win + R, type eventvwr.msc, and press OK.
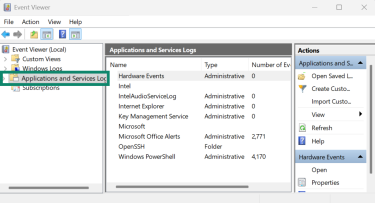
- In the left pane, open Applications and Services Logs.
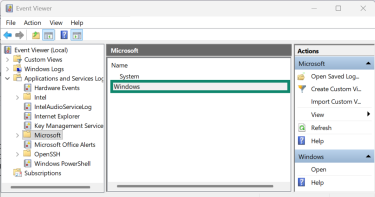
- Click Microsoft, then Windows.
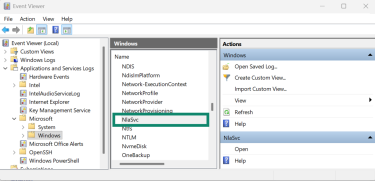
- Find and open (double-click) the relevant folders, for example, FDResPub, NlaSvc, or NetworkProfile. The image below shows the NlaSvc example.
- Click Open in the right panel and select Enable Log if it is disabled.

- After enabling it, try to use network discovery again and then check this log for any new errors or warnings.
Integrating with inventory and monitoring tools
The standard Network view in Windows is a passive and cooperative system. It mostly relies on devices announcing themselves (using protocols like FDResPub and SSDP) and responding to simple queries. This is fine for a home, but in a business environment, it's insufficient for two main reasons:
- Incomplete data: Not all devices announce themselves. An administrator needs a complete inventory of everything connected, including devices that are uncooperative or configured to be "silent."
- Security: Relying on self-reporting is a security risk. An administrator's job is to find devices that shouldn't be on the network. These "rogue" devices will certainly not announce their presence.
For these reasons, administrators use dedicated inventory and monitoring platforms. These tools do not wait for announcements; they actively probe the network to build a complete picture.
FAQ: Common questions about network discovery
Should I enable network discovery on a public Wi-Fi?
No. On public Wi-Fi or any network you don’t manage, keep network discovery off and use the Public profile. That keeps your device from replying to common local discovery queries and lowers your exposure to nearby users.
Can I disable discovery without breaking the connection?
Yes. Network discovery controls local visibility, not basic connectivity. You can turn discovery off, and your internet access will still work. This is a suitable choice on shared or untrusted networks.
Why can't I see devices even though discovery is on?
If you can’t see devices despite discovery being on, it’s usually because the other device’s profile disables discovery, a firewall is blocking traffic, essential discovery services aren’t running, the router isolates Wi-Fi clients, or devices are on different subnets without proper routing.
How does network discovery impact my security?
When discovery is on, your device answers certain local requests and becomes easier to notice on that segment. On a secured home or office network with trusted users and sensible controls, this added exposure is modest and often acceptable for the gain in usability. On public or guest networks full of unknown clients, discovery gives attackers an easier starting point, so it should stay off.
Do VPNs interfere with device discovery?
Many VPN configurations interrupt or block local discovery. A full tunnel VPN can route most traffic through the encrypted tunnel and apply rules to block direct access to local subnets. In that situation, printers and file shares on your LAN stop appearing, even though the physical link remains intact.
How do I allow device discovery while using a VPN?
Check your VPN client for options such as split tunneling or access to devices on the local network. These settings keep traffic for your local subnet outside the VPN tunnel so discovery packets still reach printers and file servers. Other traffic continues through the VPN for protection
Take the first step to protect yourself online. Try ExpressVPN risk-free.
Get ExpressVPN